
DIY Wall Art – Embarking on a creative journey to enhance your home with DIY wall art is a fun and fulfilling way to express your individuality. Whether you’re a seasoned artist or someone just starting out, there are endless ways to transform your living space with homemade artwork that reflects your personal style. From simple painting techniques to intricate collage work, the beauty of DIY wall art lies in its flexibility. You can experiment with different materials, designs, and approaches to create pieces that speak to you and seamlessly blend with your home decor.
In this guide, we’ll explore diverse techniques and creative methods for making your own wall art. We’ll cover the essential tools and materials needed for your project, as well as tips on how to display your finished creations. DIY wall art not only adds character to your home, but it also offers a cost-effective way to personalize your living space while saving on expensive decor.
Table of Contents
ToggleWhy DIY Wall Art for Home Decoration?
DIY wall art provides an affordable and highly customizable way to inject personality into your home. Unlike mass-produced prints or store-bought pieces, DIY art allows you to craft something entirely unique. Whether you prefer bold abstract designs or more traditional, minimalist artwork, the possibilities are limitless. DIY projects offer a wide range of techniques to explore, from painting and drawing to collage and even sculptural wall hangings.

Furthermore, creating your own art can be therapeutic and a great way to unwind, making it not just about beautifying your space but also about enjoying the creative process.
Getting Started: Techniques for DIY Wall Art
There are several techniques you can explore to craft your own wall art. Let’s take a look at some popular DIY approaches that are both accessible and enjoyable for artists of all levels.
1. Painting:
Painting is one of the most versatile and approachable DIY wall art techniques. Whether you’re creating a modern abstract piece or a more traditional landscape, painting allows you to explore your creativity with color, form, and texture.
- Abstract Painting: Abstract art is perfect for beginners since it doesn’t require precise skill or technique. You can use bold, vibrant colors to create interesting shapes and designs. With acrylic paints, you can achieve rich textures, layers, and bold strokes. Acrylics dry quickly, making it easy to experiment with multiple layers or colors.
- Geometric Designs: For those who love clean lines and symmetry, geometric patterns are another fantastic option. All you need is some painter’s tape to mark off sections of your canvas, and then you can fill them in with different colors to create a sleek, modern look.
- Landscape and Nature-Inspired Art: If you enjoy nature and want to bring some of the outdoors into your home, painting landscapes or botanical motifs is a timeless choice. Use watercolors for softer, ethereal depictions of natural scenes or go with acrylics for a bolder, more defined approach.
2. Drawing:
For those who prefer working with pencils or pens, drawing is a great way to create detailed, minimalist wall art.
- Line Art: One of the simplest and most effective styles for DIY wall art is line art. Using just a pencil or pen, you can create continuous line drawings that are both elegant and minimalist. Line art is perfect for those who want to incorporate subtle yet sophisticated artwork into their home.
- Charcoal or Graphite Sketching: If you’re looking for a bit more depth and contrast, try using charcoal or graphite. These mediums are great for creating dramatic shading and textures. Sketching human figures, portraits, or architectural elements with charcoal can add a classic, refined touch to any room.
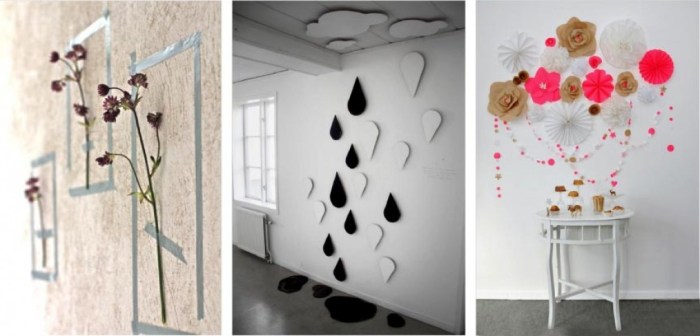
3. Collage:
Collage is a fantastic technique for those who love mixing different materials and textures. By combining paper, fabric, magazine clippings, or even found objects, you can create unique and textured wall art.
- Photo Collage: Arrange personal photos in a creative way on a large canvas to tell a story or commemorate a special event. You can add embellishments like dried flowers, fabric, or even paint over the photos to add texture and interest.
- Mixed Media: Take your collage to the next level by incorporating various materials, such as buttons, fabric swatches, ribbons, and more. Mixed media pieces are fun because they allow you to experiment with textures, colors, and even 3D elements.
Essential Tools and Materials
Before diving into your DIY wall art project, you’ll need to gather some essential materials. The tools and supplies you choose will depend on the technique you’re using, but here’s a general list of items to get you started:
- Canvas: The canvas serves as the base for your artwork. You can purchase pre-stretched canvases in various sizes from any craft store, or you can opt for canvas panels or even wood panels for a different look.
- Paints: Acrylic paints are a popular choice due to their fast-drying nature and vibrant colors. For a softer effect, you can use watercolors or gouache. If you’re working on a more detailed project, you might also want to explore oil paints, though they take much longer to dry.
- Brushes: A good set of brushes is essential for painting projects. Choose a variety of brush sizes to achieve different effects, from broad strokes to fine details. For mixed media and collage projects, foam brushes or sponges are also useful.
- Drawing Pencils: Graphite or charcoal pencils are ideal for sketching and line work. Be sure to choose different hardness levels to achieve a range of line thickness and shading effects.
- Adhesives: For collage work, you’ll need a strong glue or adhesive tape to affix various materials. Glue sticks, mod podge, or hot glue guns can all work depending on the weight of the items you’re working with.
- Scissors and Utility Knives: These are must-have tools for cutting paper, fabric, or other materials for collage. Ensure you have sharp blades for clean cuts, especially when working with delicate materials.
- Frames: Once your artwork is complete, consider framing it to give it a polished look. You can choose from simple, modern frames or more ornate options depending on your style.
Design Considerations for DIY Wall Art
When creating DIY wall art, it’s important to keep a few design principles in mind to ensure your final piece complements your home decor.
- Color Palette: Choose colors that work with your existing decor. You can opt for bold, contrasting colors to make a statement or stick to a more cohesive, monochromatic scheme for a subtle effect. If you’re unsure where to start, look at the color palette of your room’s furniture, rugs, or curtains for inspiration.
- Scale and Proportion: The size of your artwork should complement the scale of the room. A small piece of art may get lost on a large wall, while a massive canvas could overwhelm a tiny room. Take measurements before starting your project to ensure your final piece fits well in your intended space.
- Patterns and Shapes: Adding patterns, whether geometric or organic, can bring energy and movement to your wall art. Geometric patterns can be sleek and modern, while free-flowing organic shapes evoke a more relaxed and natural feeling.
- Texture: Introducing different textures can elevate your art and add depth. Consider layering paint for a 3D effect or incorporating tactile materials like fabric, wood, or metal in your collage.
How to Display DIY Wall Art
After putting time and effort into creating your artwork, it’s essential to display it properly. Here are some tips for showcasing your DIY art:
- Frame It: Framing adds a finished look to your artwork and helps protect it from damage. Simple, modern frames work well for most contemporary pieces, while more traditional frames can complement classic designs.
- Gallery Walls: Grouping several smaller pieces together to create a gallery wall can be a dynamic way to fill an empty space. Arrange your art in a grid or cluster for an eclectic, curated look.
- Shelving: Leaning framed artwork on shelves can add a relaxed, informal vibe to your space. This is a great option if you want to frequently switch out pieces or move them around.
- Floating Frames or Shadow Boxes: For artwork that has texture or 3D elements, consider using floating frames or shadow boxes. These provide depth and showcase the artwork’s unique features.
Protecting Your DIY Wall Art and Home
While creating beautiful wall art, it’s important not to forget about protecting your home and its contents. Home insurance with personal property coverage can safeguard your valuable possessions, including your DIY artwork, from theft, damage, or loss. Knowing that your creations are protected allows you to enjoy them worry-free.
Conclusion
DIY wall art offers endless possibilities for enhancing your living space with unique, personalized creations. From painting and drawing to collage and mixed media, you can explore a variety of techniques that match your style and skill level. Armed with the right tools, materials, and design principles, you can create stunning pieces that transform your home into a reflection of your artistic vision. So gather your supplies, tap into your creativity, and start crafting your own wall art masterpieces today.

